you have connected to the most awesome blog in the galaxy. Lucky you. Read away. And dont be a lame spammer. cuz that's lame and stuff.
My photo
Glanvillia, Saint John, Dominica
i am a mom/wife/textile designer gone haywire. I love to sing(music/arts AA degree), craft, exercise, and be goofy. Just living life outside the norm. And the norm thanks me for it. Oh yeah, and I like me some haikus. . . . . . . . . . What are we up to currently? Aaron recently started medical school at Ross University on the island of Dominica in the Caribbean, and the kids and I are along for the crazy ride :)
Showing posts with label crafty. Show all posts

Freezer Paper Stenciling by Hand Tutorial

Saturday, March 12, 2016

Hey-o people in cyber space!  I have been freezer-paper-stenciling t-shirts for a few years now, and after our trip to Disneyland this week (for which I stenciled 6 shirts), people have been asking for a tutorial.  There are actually a lot of tutorials on the web, many of which use cricuts or silhouette machines,  but I figured I'd show you that someone you know can do it by hand and so can you :)


Here are a few examples of shirts I've made with FP stenciling:

PREGNANT SKELETON
This is how I announced my pregnancy on Halloween, 2014

The old PEPSI LOGO
I was hired to run the Pepsi Challenge for MomDoc (largest OBGYN in the SW US).  They were throwing an 80's party for their staff.  They even had the Back to the Future DeLorean there. 
 Please excuse the pregnancy belly ;)

Of course it looks better on Megan (This was for 80's day at their school in 2015)


LUCKY St Patty's day shirts


I LOVE YOU.  I KNOW.
We have always been huge Star Wars fans, so this was my Valentine's Day gift to my Valentine :)


BOOK CROOKS
Matthew and three friends competed in the 2016 Battle of the Books.  The kids are given a list of 30 books of which they have to read at least 20 by the time the competition rolls around. At the competition the kids are asked questions from the book and when they answer they have to cite the book and state the author.  They named their team the "Book Crooks: Kern County Library's Most Wanted."  They approved the design and I made them all these shirts that they wore with black or red bandanas.  They had so much fun and Matthew ended up getting an honorable mention out of hundreds of kids!


2016 HARRY POTTER MARATHON
During Spring break 2016 our friend, Houston Goodman, flew in from Arizona and the kids had a Harry Potter Marathon.  So fun!  Here are the shirts I made them-  These babies were tedious!!
Our March 2016 Disneyland trip with our friends:

Aaron's 
SNUGGLY DUCKLING shirt
An homage to Tangled

My 
MICKEY AND MINNIE KISS shirt

John's 
SPACE MOUNTAIN SHIRT
 (Did you know Disney permanently changed Space Mountain to Hyperspace Mountain??? LAME)

Chrissy's
MARY POPPINS SHIRT

Megan's
bleached-out MEGARA SILHOUETTE SHIRT  

Jenna's
bleached-out ANNA SILHOUETTE SHIRT
They wanted to match ;)


Matthew's
bleached-out YODA SILHOUETTE SHIRT
(I sprayed with glow in the dark paint before bleaching and I added green paint for the light saber)
A girl in line at Disneyland offered to buy Matt's shirt.  LOL

I also wanted to show our elk head Christmas shirts, but I couldn't find any pictures :/ Oh well!


--------------OK!  Now for the tutorial!!------------

Freezer Paper Stenciling (by hand) TUTORIAL

You need:
Shirt- prewashed
Paint- any paint that's meant for fabric. Puff paint, slick paint, fabric spray paint (that's a new thing and it makes this even easier)
Freezer Paper- found at the grocery store in the tinfoil/ziplock bag isle
X-acto knife or Box cutter-with new/sharp blade
Self healing mat or cardboard
Printer with paper or cardstock
Tape- scotch
Foam brush-or other paint applying tool
Iron
Sharpie for correcting mistakes on black shirts
Flattened cereal box or cardboard to stick in between the shirt layers- you don't want paint or bleach coming through to the back!


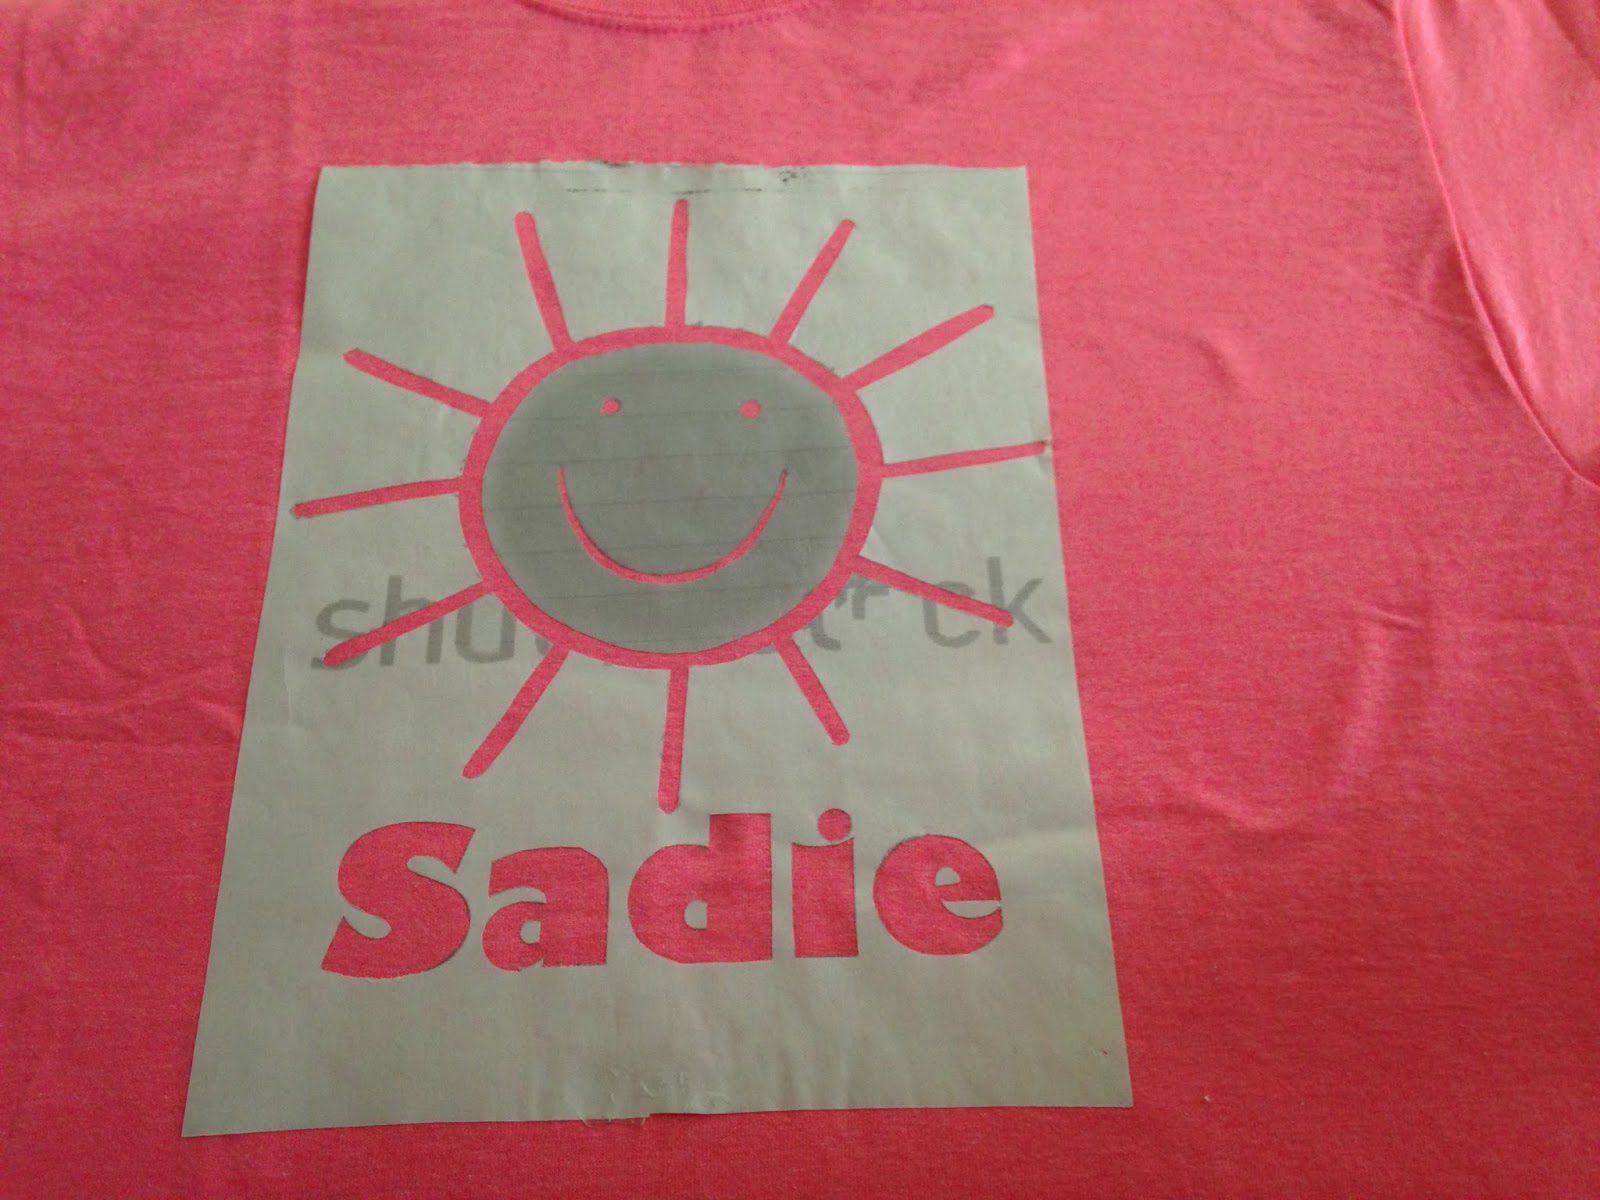
Meg and Matt's friend, Sadie's birthday party was this weekend.  I decided to make a shirt to match the stuff I bought her, so I'm using this opportunity to make your tutorial :)  The notebook and tote bag say
"Sunshine is instant happiness"

I looked online for pictures of sunshine happy faces. 


I didn't find one that looked exactly the way I wanted so I just chose the closest thing and edited it, I also added Sadie's name and changed the color to grayscale so I wouldn't use up expensive ink


Then I cut out freezer paper the size of printer paper and taped it together to run through the printer.


Make sure to only tape the top and bottom so that the picture prints as smoothly as possible.  Make sure the plastic/shiny side of the freezer paper is taped down to the printer paper so it will print on the paper/dull side. ALSO I like to use cardstock.  It seems sturdier to me, but you can use regular paper if you want.


Print, remove freezer paper from printer paper and cut out with an X-acto knife or box cutter on a self healing mat or cardboard.  If your design is big and easy then you could cut it with scissors.  Use your discretion.


 Be mindful of which part of the paper you will be using.  If I want the outline, rays, happy face, and name to be painted surrounded by pink t-shirt, then I use the paper on the left.  If I want those things to be t-shirt color with paint in the negative areas, I would use the design on the right (like the bleached-out t-shirt design).


 Iron at high temp right on to the shirt.  Make sure to go over each part specifically to make sure it irons down.  Let it cool and seal the plastic bond before painting.


 Yes, I ironed on those TEEENY insides of the letters.  Don't throw them away!
Now don't forget to put some cardboard or flattened cereal box between the layers of your shirt.

 Time to paint!!
Use a foam brush to dab paint on.  If you pull the paintbrush across the shirt instead of dabbing, you can push paint between the stencil and the fabric, which you don't want.  Once the first coat is done, you can then pull the brush across because the first coat seals the edges down.  I usually do 3 coats, drying completely between each.
 I'm impatient.  You don't need to use a blow dryer like I did. I don't always but I needed to send this gift with the kids in a matter of minutes.  I'm a procrastinator.

Once COMPLETELY dry, pull it up!

The paper will rip in small places.  It's ok, just pinch it and pull it off.

HOW CUTE IS THAT?!?!?:!

 I love this happy sunshine shirt!  I want one!


Other noteworthy tips:

-A hint for anyone doing this for the first time- if you use a black t-shirt you can fix mistakes with a black sharpie ;) 

-You can change it up with different textured sponges, paints, and even striped or otherwise patterned shirts :) 


-Beware: NOT ALL PAINTS ARE CREATED EQUAL! One I got for really cheap ended up being too watery and made the stencil soggy.  If you get a paint like that, don't throw it away, just let it sit out to thicken up (but the best bet is to not get the absolute cheapest paint you can find like I did ;)


-For the bleached-out version: just iron on the negative of the stencil like I mentioned before, put your cardboard between the layers of the shirt, and lightly spray with straight bleach. As soon as it turns the color you want, rinse out immediately, remove any remaining stencil, and then wash with detergent in the washing machine and dry in dryer.  *note: please use gloves and mask when using bleach

If you use this tutorial, please post pictures of your creations!  I'd love to see the great designs you come up with!

HAVE FUN!!! 


Home-Made Rubber Stamps

Thursday, January 28, 2016

I thought the price of rubber stamps was ridiculous so I bought a 49¢ 2 pack of erasers and used my rusty broken box cutter to make my own! That was fun! I need more erasers!
I am in charge of
An aquarium field trip
Stamp 200 hands!
(Written in haiku form in honor of Haiku Wednesday)


Thanks, God, for Spit-up

Sunday, November 13, 2011

Tonight I went to my B's blessingway.  Have you ever heard of a blessingway?  Traditionally, it is a native american ritual where an expectant mothers' closest friends come together while the mother waits for her baby to come and they offer spiritual support and such.  This was not that.  This was a really refreshing alternative to a baby shower (even though Brittney also had a baby shower last week, ha ha).  Here's a little from the invite:

A blessingway is for honoring the mother and giving her love and support before her birthing time. Learn more about blessingways here.

Appropriate gift ideas:
~personal letter
~poem by you or someone else
~coupon offering specific help, ex: "1 hour of babysitting any weekday morning"
~something handmade for the mother
~pampering item for the mother, like lotion

A light dinner will be provided. Bring your birthy love energy and well wishes for Brittney and her baby!  We appreciate your prompt RSVP.  Can't wait to see you there!
We all got together for a light dinner and chatting.  We went around the room and offered a poem or word of advice or spiritual thought for Brittney in preparation for her baby to come this week (yes, there were tears), shared gifts (I'll show you mine in a second), and each stamped part of a leather bracelet for Brittney to wear this week.  She chose the words Birth Faith and we each stamped a letter into the leather band with a mallet.  Before we left, we each chose a bead and a word to be made into a necklace for her as well.  My bead was a sphere with swirled lighter shades of this dark sandy-textured sea green  (HTML #698B69).  I chose the word "calm."   We were each given a little jar with a candle to light when we hear the news that the baby's ready to come (to remind us to keep our thoughts with her while it's lit).
This whole thing sounds so hippyish, and those who know me know I'm a little anti-hippy sentiment, but I have to say that I'd rather this than a babyshower any day (although britt's baby shower was fun- don't get me wrong- this is just a general observation).  This is just so much more personal and supportive for mommy-to-be.
If you know my B, you know that her baby was found to have a cleft lip in the ultrasounds.  They don't know yet if he'll have a cleft palate, but they're preparing for it.  They've got special expensive bottles and B is worried about nursing and how difficult feeding him will be.  She also mentioned how all of the things you normally worry about with your baby seem so trivial once you're faced with a big challenge.  Mothers who worry that their baby has a little mark on their arm or funny hair or the like, need to wake up and realize what miracles their children really are.  Be thankful for the cries (that means your child can breathe).  Be thankful for your child's eavesdropping when you're having a serious conversation (that means your child can hear).  Be thankful for the midnight feedings (that means your child can eat).
With that in mind, I made this haiku and these burp cloths (specific to her instance):
 What a goofball.  Do you like the fifties outlet right in the middle of the wall?  I know. weird.  Also, see the mickey mouse band-aid I have on my middle finger?  That's cause I accidentally sawed through the top of my finger and fingernail yesterday.  You'd think that the knife wouldn't make it through that sheild of a fingernail, but holy crud it sliced through like butter. fun stuff.

ug slouching. and dumb face.  why do I make such faces?  oh yeah, that's just how my face is.  drat.

And that's just how HIS face is too, apparently.  Yes, that's a QT cup back there.  And yes, there's also a cup from Costco where I had the always amazing polish sausage with kraut and diet coke this afternoon for a buck fifty.  Also, see the cloth I'm making- how it's got a little dip in it along the edge?  That goes right by your neck so it stays on your shoulder more easily. 


the haiku goes:
a baby who burps
is a baby who's well-fed.
thanks, God, for spit-up.

and I put TGFS (Thanks, God, For Spit-up) on one corner of each burp rag (using the freezer-paper method).  Helps keep things in perspective.  Brittney got some pictures at the blessingway so I'll post them when she sends them :)
These are made of cotton print and jersey. The top two are backed in an olive green jersey that matches the green stripe on the the 3rd cloth and the bottom two are lined in dark brown.


ADDENDUM: Here she is :)

 Isn't she cute? :)
oops, I should've had her wear it on the other shoulder so you could see the writing. oh well :)

a little peak at today's project.....

Saturday, October 29, 2011

The colors are a little off in this picture.... but I'll post a better picture tomorrow of the finished product after I give it to my B.  I didn't want to show you how cute it turned out until she saw it first in person :)  All super fuzzy soft stuff.... and now my entire house is super fuzzy soft. lol

Poor Jud is dead.

Thursday, January 13, 2011

Such a sad day- Our car is officially dead.  It now needs a new engine.  This old car is not worthy of a new engine, therefore we are going car shopping tomorrow and the next day.  I've got to find a car before school starts next week! bleh!  If you're looking to sell a car, please let me know.  I am hoping to get something with more than 5 seats, but I'll take what I can get.  Email me if you know of anything!

Happy news- I just finished my first crochet project ever while I waited for Matthew in karate tonight.. I've started a few crochet projects over the years but I've never completed any until today woo hoo! Here's a link to it if you want the pattern. I made mine a little bigger and dopey, but it's still cute. And here's the kicker- it was fast and easy. If it's complicated and takes forever, forget it! Anywho, sorry about the poor quality pic- my phone stopped taking pictures and I'm using Aaron's phone. booo. Me needs a camera.

Ok, I promise I'll post the hummus recipe tomorrow! Pinky PROMISE!! I was going to serve it at dinner tomorrow when we had friends over but now we're cancelling the dinner to go car shopping :( , so I guess I'm going to have to just eat all the rest of it and post the recipe instead. One thing I've learned as I've maowed on this hummus is that when you're dieting you CAN have too much of a good thing.  Oh boy can you.  I'm really surprised that I've maintained my weight.... maybe it's because I'm working out again.... speaking of which...

I started up the exercise group again if anyone is interested in working out at 5:30 in the morning for free let me know~ I'm lead a workout group that does boot camp style workouts at ASU East campus.  Lemme know, peeps!

Signing off!

Oh- remind me to tell you about the celebrity function Aaron and I will be singing at on Monday with William Joseph and the commercial shoot for US airways we'll be doing in a week! Boo-yah!

[Clever kid-related blog title here]

Thursday, May 7, 2009

Hey friends. Just wanted to post a little about what the kids have been doing lately....

1. They have their very own box garden :o)The kids wanted to be in
my garden all the time, so I made them their own and they love it!

I got a wooden pallet (the kind used for fork lifts) from the side of a dumpster (yes, me and the dumpsters, I know) and I pryed two boards off the top and nailed them to the sides and ta-da! A garden box! (with really good drainage, too)
Matthew planted corn and cantaloupe in his side and Megan planted watermelon and cinnamon basil. Matthews just came up and hopefully Megan's won't be too far behind! fun, fun!


2. They now have dish duty :o)
I probably waited a little longer to teach them this than I should've, but my kids are now dish-doing dudes! yay! they love it!
3. They had fun painting today :o)
This has got to be the most AWESOME-est Bakugan-holder ever! Matthew does a really good job painting- he loves to make sure every little spot is covered.
If you don't know what Bakugan is, it's the latest and greatest toy to get for boys right now. It's kind of a spin off of Pokemon but when you play, you roll the bakugan balls over cards and if they pop open (see below) on the same card as the opponent, you battle. Don't ask me more than that, that's all I know. The card has a metal plate in it and the balls have a magnet in a little spot in the bottom where if that spot touches the metal plate, it pops open to form a creature of some sort. They're fun to open.
Megan's teacher asked her to make a replica of her crocodile, Pippa, for her new preschool (Sunshine Sharing Preschool) and told her she'd pay her for it. Awesome-

She hasn't painted the white eyes or teeth yet, so they are still blue, but you get the idea. We'll post a pic when it's done. Megan is starting out young with her crafting business. ha ha. She said that she wants to make a catalog to "sell home-made toys, and blankets, and cushy pillows" And Matthew's job is to mail the catalogs and toys all over the world. She cracks me up.
Speaking of crafts and painting, I did another bow holder- this time for Megan. She saw me do the ones for her friends and wanted one so badly, so here it is. It doesn't even hold all of her bows... how sad. Oh well, it's cute anyway.