Planting season starts
with hope and wild abandon
Start your garden now~
Planting Schedule

Wasn't that a frigging awesome post? yeah? I think you should comment and say something about how much you enjoyed it. Dont you?
0
comments
![]()


Wasn't that a frigging awesome post? yeah? I think you should comment and say something about how much you enjoyed it. Dont you?
3
comments
![]()

Wasn't that a frigging awesome post? yeah? I think you should comment and say something about how much you enjoyed it. Dont you?
0
comments
![]()
Wasn't that a frigging awesome post? yeah? I think you should comment and say something about how much you enjoyed it. Dont you?
0
comments
![]()
Hey y'all! Here is the 6 week progress video(s). I took two different videos and I like both so I'm showing both :o)
Also, I dug our garlic up, braided the roots together and hung it to dry! I'm sad that I only harvested 2 of them- the others I had to dig up and transplant to pots to make room for the garden in April and I wasn't able to save them- the larger of these two was transplanted and did alright but I had three die on me :o( I ripped too many roots. I can't wait to plant some more in October! What fun! 


Wasn't that a frigging awesome post? yeah? I think you should comment and say something about how much you enjoyed it. Dont you?
3
comments
![]()
Click here for the 3-week progress. You will be amazed at how much all of this stuff has grown in a week. Here is a video of my garden in it's 4th week of existance. I'll do a tutorial on the pvc watering system for you guys if you want, just let me know. It was a lot of fun and it now takes about 1 minute to water my garden. awesome.
If you haven't read about the garden, please see
GARDENING WITH MITTLEIDER part I
GARDENING WITH MITTLEIDER part II
GARDENING WITH MITTLEIDER part III
Wasn't that a frigging awesome post? yeah? I think you should comment and say something about how much you enjoyed it. Dont you?
1 comments
![]()
 This is a serious problem..... I have these tomatoes ripening left and right and they are soooo good. I'm actually quite surprised I love them so much because I'm not really a tomato person. and definitely not a cherry tomato person. I hate the feeling of the tomato bursting in your mouth. yuck. I do not like tomatoes in salad, but I do like a good tomato sliced thick with salt and pepper. mmmmm. these are perfect for that (even though they are small) they are so yummy with a little s&p. yay for the first veggies yielded from my delectable garden.
Wasn't that a frigging awesome post? yeah? I think you should comment and say something about how much you enjoyed it. Dont you?
2
comments
![]()
Before reading this post, please be sure to read:
GARDENING WITH MITTLEIDER part I
GARDENING WITH MITTLEIDER part II

So sorry about the tutu folks. Welcome to my life :o)
This one is really dark, SO sorry!
Wasn't that a frigging awesome post? yeah? I think you should comment and say something about how much you enjoyed it. Dont you?
0
comments
![]()
Hey friends. Just wanted to post a little about what the kids have been doing lately....
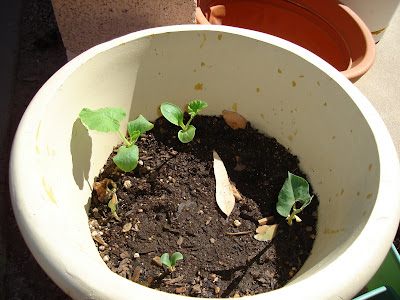
1. They have their very own box garden :o)The kids wanted to be in my garden all the time, so I made them their own and they love it!
 I got a wooden pallet (the kind used for fork lifts) from the side of a dumpster (yes, me and the dumpsters, I know) and I pryed two boards off the top and nailed them to the sides and ta-da! A garden box! (with really good drainage, too)
 3. They had fun painting today :o)
 This has got to be the most AWESOME-est Bakugan-holder ever!
  Matthew does a really good job painting- he loves to make sure every little spot is covered.


 Megan's teacher asked her to make a replica of her crocodile, Pippa, for her new preschool (Sunshine Sharing Preschool) and told her she'd pay her for it. Awesome-
 Megan is starting out young with her crafting business. ha ha. She said that she wants to make a catalog to "sell home-made toys, and blankets, and cushy pillows" And Matthew's job is to mail the catalogs and toys all over the world. She cracks me up.

Wasn't that a frigging awesome post? yeah? I think you should comment and say something about how much you enjoyed it. Dont you?
2
comments
![]()


When you first water your seeds keep the beds wet until they sprout. After that, water once a day first thing in the morning -1 inch of water in the bed and that's it. if you live somewhere especially wet and dry like AZ you may need to water 2x a day in the summer. If your plant is wilting it is dying, so watch your plants to see if they need more water.
If you have a problem with salinity (salt) in the soil, create the beds, then flood it three times and it will get the salt far enough down away from the planting area that your plants wont be affected.
It is important to have level beds so that all nutrients given to the plants will stay and soak into the soil where they are placed, rather than running to the lowest point of the bed when watered. (I have a video of how to level the beds coming soon)
Water only the root zone of the plant. *Do not sprinkle* this will water weeds, waste water and promote disease. Try your hardest to not get the rest of the plant wet when you water- this just promotes disease as mentioned. If you automate water using an above the ground drip system it will be easier, faster, and more efficient. Using 3/4 inch #200 psi pvc piping (painted with exterior paint) and drill 3 #57bit holes every 4 inches. Set this on a 6"long 2x4 to suspend above root zone. (when I make mine I will video and post)
Major Elements
Otherwise known as NPK and is available at any garden center. You will need 16-16-16. 16-16-16 is the relative percentage % of Nitrogen (N), Phosphorous (P), and Potassium(K) .
Plants use these nutrients to develop different parts; N builds strong leaves, Phosphate builds strong roots, and Potash promotes root development and disease resistance.
Secondary Elements
Trace Elements
A continutous supply of these elements is best, so feed them every week! I will include the fertilizer recipes at the bottom of this post.
6. Competition
weeds, bugs, animals
Weed early and often. do not use mulch. keep ground dry and bare.
Prevent disease and bugs! Pick fruits as soon as they are ripe and prune your plants so that no leaves are touching the ground (we will be training all our plants UP). Clear the ground of any trimmings and pull out and dispose of plants as soon as they are done fruiting. Do not let fruit rot on the plant. Do not let your plants get over-watered.
Other notes:
A lot of people are concerned about the pH of the soil. For us in the southwest, the pH of soil is fixed when you add the preplant mix with gyspum. To determine if your soil is acidic or alkaline, a good rule of thumb is: any place that gets more than 20" of rain a year is acidic and any place that gets less than 20" is alkaline. If you live somewhere with more than 20" of rain a year, replace the gypsum in the preplant recipe with pulverized lime or garden lime. A good gardening pH is 6.
The fertilizer recipes are as follows:
Preplant mix
80 parts gypsum (find in a large bag at most gardening stores)
4 parts Epson salt (Found at the drug store in First Aid)
1 part Boron (found at most grocery stores in the laundry isle as BORAX laundry booster)
Remember these are parts not percents. Add to center of the isles once they are made and leveled. cut into soil until you cant really see it anymore and then level again. You don't want to add before isles are made because it's a waste of fertilizer. You will be adding 1 oz or 2 tablespoon per square foot.
Weekly Feed
25 lb bag NPK
4 lbs Epsom Salt
10oz of Magic Mix (I get this from the foodforeveryone.org website. It has the trace elements that are very hard to find, and when they are found can only be purchased in large quantities. Foodforeveryone has small bags with all of it mixed in the correct proportions. Either only mix as you need it or invest in some perlite to add so that once mixed, it doesn't get wet and goopy. )
Apply 1/2 oz or 1 Tbs per square foot close to, but not touching the plant. Do not work into soil (except when you are adding it along with the preplant mix), just water it and it will gradually dissolve into soil. When to apply: with the preplant mix, 3 days after all sprouts come up, and then once per week until after harvest.
Here are the first four videos. Please excuse what a horrible tutorial maker I am and my pants that are falling off during all these videos. I pulled the pants out of the dryer before they were completely dry so they never got set in their real shape, got stretched out in the first 2 minutes, and were huge in me all day during all these videos. Also, as you can see by the shadows in the videos, I didn't follow the mittleider method completely in getting full sun, but the important thing is to do the best with what you have. You have no excuse to not be gardening!
ok, I actually said the wrong amount to apply on this video- it's 2Tbs per square foot. The weekly feed is 1 Tbs per running square foot. Sorry about that! Just mix up a bunch and share your left overs with your neighbors! That's what I've been doing!
Wasn't that a frigging awesome post? yeah? I think you should comment and say something about how much you enjoyed it. Dont you?
4
comments
![]()
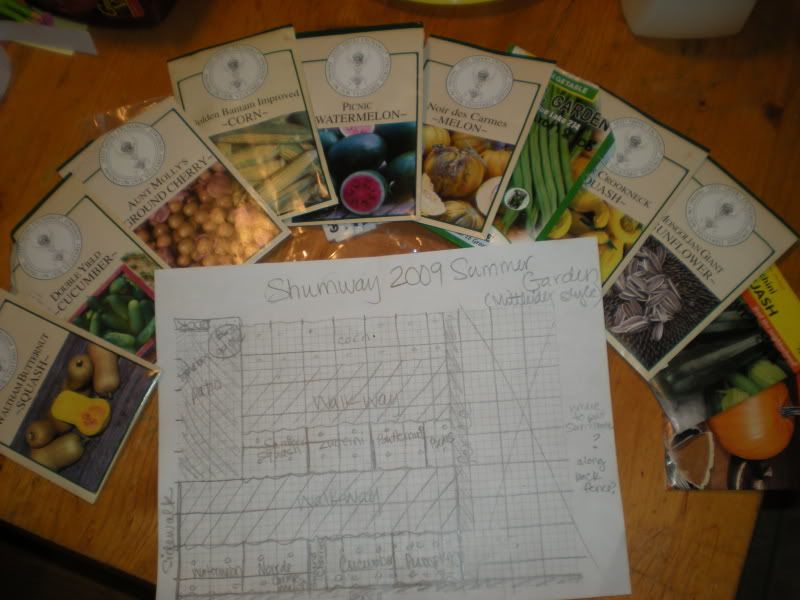
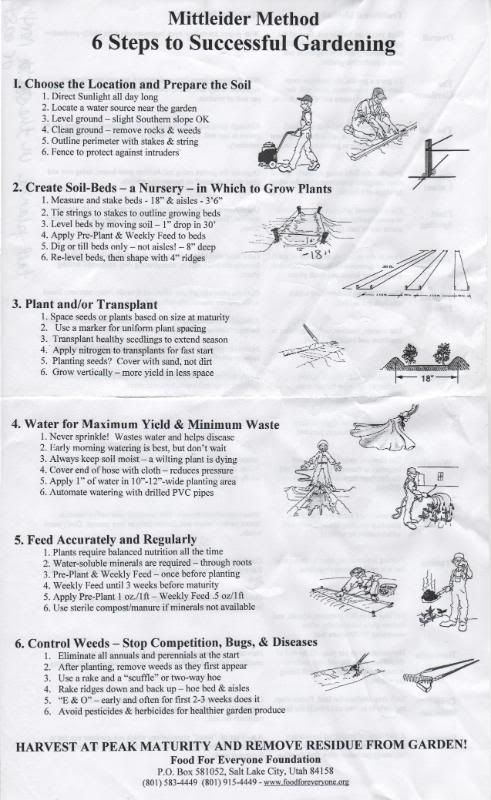
If you want me to email you these notes so they're easier to read, just let me know. Also, if you click on them they will become a tiny bit larger.
Here is a little bit about the Method from Jim Kennard:
Here is my garden planning vid:
PS- If you're a gardener, here is a Gardening Journal from FFE foundation you might appreciate
GARDENING WITH MITTLEIDER part II
GARDENING WITH MITTLEIDER part III
Wasn't that a frigging awesome post? yeah? I think you should comment and say something about how much you enjoyed it. Dont you?
6
comments
![]()
I decided to make this garden tour a post of it's own instead of adding it to the last post. That's so it will show up as a change on my blog and people will actually come and check it out :o). I just need to apologize for how annoying I am in this video. sorry. Listen to the way i say peppers- what the heck kind of accent is that? Also, I turn the vid on it's side at times but it eventually turns back, so just bear with me!
Since then.....
My tomato and pepper plants are twice as big as they are in the movie and it's only a week later!

My mixed greens have grown and I cleaned up all the dead leaves- looks a little more appetizing, eh? When you saw my brussel sprout plant in the video, were you wondering where the actual sprouts were?
 Here they are! On the top of each branch next to the trunk of the plant are small darker green balls- one per branch. Those will grow in to the brussel sprouts. Aren't plants interesting??
 Here are the carrots we picked today! Nice and big! We are picking them a little at a time so that they don't go to waste.
  We shared this yummy carrot today- it was a little bitter near the bottom, but as the carrot got bigger it got sweeter and yummier.
 Right Megan?
Wasn't that a frigging awesome post? yeah? I think you should comment and say something about how much you enjoyed it. Dont you?
3
comments
![]()
Wordless Monday..................
Wasn't that a frigging awesome post? yeah? I think you should comment and say something about how much you enjoyed it. Dont you?
0
comments
![]()


 Higley Stake Preparedness Fair
 November 1, 2008
7:00 – 10:00
Pancake breakfast from 7-8:30 booths open til 10
In the LDS Chapel parking lot on Recker & Warner
Featuring:
· Menus & recipes for 3-month emergency storage
· Gardening
· Herbs and their uses
· First aid
· Long and short term water storage
· Fingerprinting & DNA kits
· Integrating the cannery in daily living – menus & recipes
· Food preservation methods
· Solar cooking and fuel storage
· Humanitarian displays
· And more . . . .
Wasn't that a frigging awesome post? yeah? I think you should comment and say something about how much you enjoyed it. Dont you?
3
comments
![]()
 "Wanted! A vegetable that will grow in any climate, will rival meat in nutritive value, will mature in 3 to 5 days, may be planted any day of the year, will require neither soil nor sunshine, will rival tomatoes in Vitamin C, will be free of waste in preparation and can be cooked with little fuel and as quickly as a ... chop." -Dr. Clive M. McKay, Professor of Nutrition at Cornell University.
 Dr. McKay was talking about sprouts. (To see the wonderful nutritional value of Sprouts, see sprout info below the tutorial)
I'm going to teach you all how to sprout alfalfa seeds in your kitchen! It's awesome! My daughter eats sprouts on everything now. She even asked for some on her scrambled eggs the other morning which I hesitated at at first, but heck, why not? She finished the sprouts and left some of the eggs unfinished. LOL I have felt so good since I made these sprouts part of my daily diet, so naturally I want to share the wealth!
 -a mesh strainer * (I did my first batch without this, but it's easier with it)


 Once sprouts are about an inch long, or after one week, place moist green sprouts in an airtight bag or container and put them in the fridge for keeping.
Wasn't that a frigging awesome post? yeah? I think you should comment and say something about how much you enjoyed it. Dont you?
5
comments
![]()
 Ok, so I was (ok, am) the type of person who scoffs at tree huggers and this whole green movement, so how how did I get to this place where I am vermicomposting with worms under my sink, using organic materials to fertilize (kelp), enriching my soil with Vermiculite and composted horse manure, and reusing playdoh containers for my window sill herbs??


Wasn't that a frigging awesome post? yeah? I think you should comment and say something about how much you enjoyed it. Dont you?
5
comments
![]()


