you have connected to the most awesome blog in the galaxy. Lucky you. Read away. And dont be a lame spammer. cuz that's lame and stuff.
My photo
Glanvillia, Saint John, Dominica
i am a mom/wife/textile designer gone haywire. I love to sing(music/arts AA degree), craft, exercise, and be goofy. Just living life outside the norm. And the norm thanks me for it. Oh yeah, and I like me some haikus. . . . . . . . . . What are we up to currently? Aaron recently started medical school at Ross University on the island of Dominica in the Caribbean, and the kids and I are along for the crazy ride :)
Showing posts with label diy. Show all posts

Freezer Paper Stenciling by Hand Tutorial

Saturday, March 12, 2016

Hey-o people in cyber space!  I have been freezer-paper-stenciling t-shirts for a few years now, and after our trip to Disneyland this week (for which I stenciled 6 shirts), people have been asking for a tutorial.  There are actually a lot of tutorials on the web, many of which use cricuts or silhouette machines,  but I figured I'd show you that someone you know can do it by hand and so can you :)


Here are a few examples of shirts I've made with FP stenciling:

PREGNANT SKELETON
This is how I announced my pregnancy on Halloween, 2014

The old PEPSI LOGO
I was hired to run the Pepsi Challenge for MomDoc (largest OBGYN in the SW US).  They were throwing an 80's party for their staff.  They even had the Back to the Future DeLorean there. 
 Please excuse the pregnancy belly ;)

Of course it looks better on Megan (This was for 80's day at their school in 2015)


LUCKY St Patty's day shirts


I LOVE YOU.  I KNOW.
We have always been huge Star Wars fans, so this was my Valentine's Day gift to my Valentine :)


BOOK CROOKS
Matthew and three friends competed in the 2016 Battle of the Books.  The kids are given a list of 30 books of which they have to read at least 20 by the time the competition rolls around. At the competition the kids are asked questions from the book and when they answer they have to cite the book and state the author.  They named their team the "Book Crooks: Kern County Library's Most Wanted."  They approved the design and I made them all these shirts that they wore with black or red bandanas.  They had so much fun and Matthew ended up getting an honorable mention out of hundreds of kids!


2016 HARRY POTTER MARATHON
During Spring break 2016 our friend, Houston Goodman, flew in from Arizona and the kids had a Harry Potter Marathon.  So fun!  Here are the shirts I made them-  These babies were tedious!!
Our March 2016 Disneyland trip with our friends:

Aaron's 
SNUGGLY DUCKLING shirt
An homage to Tangled

My 
MICKEY AND MINNIE KISS shirt

John's 
SPACE MOUNTAIN SHIRT
 (Did you know Disney permanently changed Space Mountain to Hyperspace Mountain??? LAME)

Chrissy's
MARY POPPINS SHIRT

Megan's
bleached-out MEGARA SILHOUETTE SHIRT  

Jenna's
bleached-out ANNA SILHOUETTE SHIRT
They wanted to match ;)


Matthew's
bleached-out YODA SILHOUETTE SHIRT
(I sprayed with glow in the dark paint before bleaching and I added green paint for the light saber)
A girl in line at Disneyland offered to buy Matt's shirt.  LOL

I also wanted to show our elk head Christmas shirts, but I couldn't find any pictures :/ Oh well!


--------------OK!  Now for the tutorial!!------------

Freezer Paper Stenciling (by hand) TUTORIAL

You need:
Shirt- prewashed
Paint- any paint that's meant for fabric. Puff paint, slick paint, fabric spray paint (that's a new thing and it makes this even easier)
Freezer Paper- found at the grocery store in the tinfoil/ziplock bag isle
X-acto knife or Box cutter-with new/sharp blade
Self healing mat or cardboard
Printer with paper or cardstock
Tape- scotch
Foam brush-or other paint applying tool
Iron
Sharpie for correcting mistakes on black shirts
Flattened cereal box or cardboard to stick in between the shirt layers- you don't want paint or bleach coming through to the back!


Meg and Matt's friend, Sadie's birthday party was this weekend.  I decided to make a shirt to match the stuff I bought her, so I'm using this opportunity to make your tutorial :)  The notebook and tote bag say
"Sunshine is instant happiness"

I looked online for pictures of sunshine happy faces. 


I didn't find one that looked exactly the way I wanted so I just chose the closest thing and edited it, I also added Sadie's name and changed the color to grayscale so I wouldn't use up expensive ink


Then I cut out freezer paper the size of printer paper and taped it together to run through the printer.


Make sure to only tape the top and bottom so that the picture prints as smoothly as possible.  Make sure the plastic/shiny side of the freezer paper is taped down to the printer paper so it will print on the paper/dull side. ALSO I like to use cardstock.  It seems sturdier to me, but you can use regular paper if you want.


Print, remove freezer paper from printer paper and cut out with an X-acto knife or box cutter on a self healing mat or cardboard.  If your design is big and easy then you could cut it with scissors.  Use your discretion.


 Be mindful of which part of the paper you will be using.  If I want the outline, rays, happy face, and name to be painted surrounded by pink t-shirt, then I use the paper on the left.  If I want those things to be t-shirt color with paint in the negative areas, I would use the design on the right (like the bleached-out t-shirt design).


 Iron at high temp right on to the shirt.  Make sure to go over each part specifically to make sure it irons down.  Let it cool and seal the plastic bond before painting.


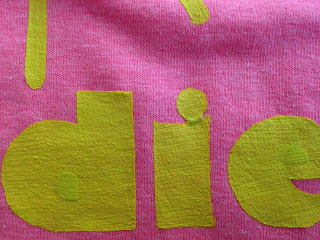
 Yes, I ironed on those TEEENY insides of the letters.  Don't throw them away!

Now don't forget to put some cardboard or flattened cereal box between the layers of your shirt.

 Time to paint!!
Use a foam brush to dab paint on.  If you pull the paintbrush across the shirt instead of dabbing, you can push paint between the stencil and the fabric, which you don't want.  Once the first coat is done, you can then pull the brush across because the first coat seals the edges down.  I usually do 3 coats, drying completely between each.
 I'm impatient.  You don't need to use a blow dryer like I did. I don't always but I needed to send this gift with the kids in a matter of minutes.  I'm a procrastinator.

Once COMPLETELY dry, pull it up!

The paper will rip in small places.  It's ok, just pinch it and pull it off.

HOW CUTE IS THAT?!?!?:!

 I love this happy sunshine shirt!  I want one!


Other noteworthy tips:

-A hint for anyone doing this for the first time- if you use a black t-shirt you can fix mistakes with a black sharpie ;) 

-You can change it up with different textured sponges, paints, and even striped or otherwise patterned shirts :) 


-Beware: NOT ALL PAINTS ARE CREATED EQUAL! One I got for really cheap ended up being too watery and made the stencil soggy.  If you get a paint like that, don't throw it away, just let it sit out to thicken up (but the best bet is to not get the absolute cheapest paint you can find like I did ;)


-For the bleached-out version: just iron on the negative of the stencil like I mentioned before, put your cardboard between the layers of the shirt, and lightly spray with straight bleach. As soon as it turns the color you want, rinse out immediately, remove any remaining stencil, and then wash with detergent in the washing machine and dry in dryer.  *note: please use gloves and mask when using bleach

If you use this tutorial, please post pictures of your creations!  I'd love to see the great designs you come up with!

HAVE FUN!!! 


Haiku Wednesday

Wednesday, January 4, 2012

Planting season starts
with hope and wild abandon
Start your garden now~
Planting Schedule

Halloween costumes and other interesting stuff

Tuesday, November 8, 2011

Halloween night. 
Matthew was Indiana Jones (with a real whip made by friend David Gibbens)
Aaron was "life" and had boxes of lemon heads to hand out
I was Grecian handmaiden to Megan, who was the goddess Aphrodite (She's been really in to Greek Mythology for the last 6 months).
(I had already made my outfit for a program I sang in called Women at the Well a litte over a year ago, so all I had to make last week was Megan's outfit and jewelry and Matthew's leather satchel)

......and heeeeere's Johnny!
As you can see I had a lot of projects going on at once, but
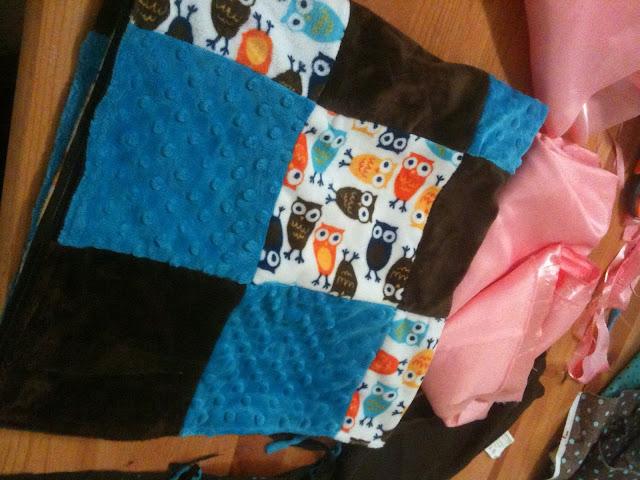
Johnny= the minky quilt I made for my Brittney (otherwise referred to as B or really any word that starts with B).  Holy Fazolis minky fabric is the devil. My house was a fuzzy fluffy mess when I was done. All of the pieced side is fur, there is no stuffing, and the other side is actually made from a very high thread count sheet so it's nice and soft, too.  This is folded into fourths in this pic, I think.  It's basically big enough to wrap a baby in and small enough for a little kid to carry around while sucking their thumb.  And soft enough to never want to leave behind :)  I want one for me now.... too bad I got all the fabric from the fur scrap pile (any fabric left on the bolt that was less than a yard) at SAS and had barely enough for the baby quilt. no duplicating.... booo...  well, there is a teeny tiny little bit left... hmmm.... what to make, what to make.... 
It's funny- Megan will say Mom, can I have your scraps?  and I'll say uhhh honey, Mommy doesn't have scraps. Anything I have left over is just fabric I'm saving for another project.  ha.  it's so true.  but I give her some anyway.

Some funny things the kids said today:
Matt told Megan that her feet were "EXTREMELY smelly." (which, really, that boy's feet smell like pedivomit, so he's the world's shortest hypocrite)
and when we were singing the name game (you know, Stephy Stephy bo bephy banana fanna fo feffy me mi mo mephy, Stephy)
Megan said, no one do "Mutthead" cause that would be bad.
Oh, AND the 6 year old genuinely beat me in a thumb war tonight.  What has the world come to?  I think I'm going to have to cut down on the protein I feed that kid.

Kids make life so much more interesting.  In an innocent funny sweet kind of way.

a little peak at today's project.....

Saturday, October 29, 2011

The colors are a little off in this picture.... but I'll post a better picture tomorrow of the finished product after I give it to my B.  I didn't want to show you how cute it turned out until she saw it first in person :)  All super fuzzy soft stuff.... and now my entire house is super fuzzy soft. lol

Prickly Pear Jelly

Thursday, August 11, 2011

Ok, Rebekkah, this is for you J


  I made this tutorial in 2009 and apparently I didn’t post it on the blog... uh yeah..  who knows why.  I did it a week before teaching the young women how to do it at an activity.  In the pictures Matthew is his cute 4-yr-old self. awww.  cute.  Anyway, I’m posting it now because:

ItS tImE tO pIcK yOuR pRiCkLy PeArS! 
This week, people!  If you don’t have access to one, just drive out to ASU East- we have the most productive prickly pear cacti I’ve ever seen right by the VA Hospital.
Things you’ll need:
Tongs
Rubber Gloves- BTW you'll get pokies EVERYWHERE.
Bucket
A hat. cause it’s hot out there.
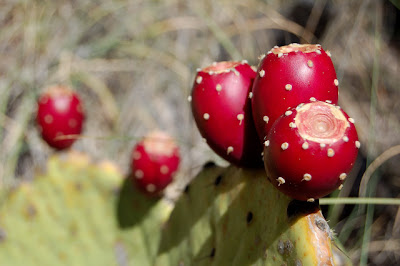
Pick Prickly Pear Fruits in late July or Early August when very ripe.  Pick them with tongs and they should almost lift off the plant without effort.  If they are hard to remove, they are not ready so don't force it (first hose down cactus fruits if the plant is in your yard, if not, swish with water after fruits are picked).  Easy Peasy!  Don't be afraid, my 4yr old did it! Just pinch and twist.


 however, I don't think any of us will look as cute as this when we're picking them .... it's not possible to attain this level of cute past kindergarten!


Here they are in the bucket all yucky and dirty- wash them off- I used a potato scrubber. 

 Here they are all washed and ready to cook

Barely cover clean fruits with water in large kettle and simmer with lid on until very soft. 

 Mash with Potato Masher.  This will look really weird and the little brownish greenish slimey seeds will emerge.  I love nature. 

Do not strain.  Now cover a deep bowl or pot with a pillowcase and pull tight and bind the case with a rubberband.  This is your seive. 

Sieve through clean cloth. Do not squeeze fabric or try to mush fruit while on the cloth as this could move pricklies through the cloth and into your juice. Just pour the mush on top and let it sit for 15-20 minutes or so so that all the juice can work it's way through on it's own.  Patience is, in fact, a virtue.
 Rinse remains down the disposal then wash fabric in washer.
Now you have your Prickly Pear Juice! Kudos!
(note: For a stronger flavor you can reduce your juice by
boiling it down to your desired strength.  This concentration works fine, though)
Here is the Recipe for the Jelly:

CACTUS JELLY (that's what my mom calls it)
Stir in tall kettle:
3 ½ cups cactus juice
½ cup lemon juice
1 pkg pectin 
(little side note... Instead of Sure Gel pectin, there is a new pectin that you can get in UT[and maybe here] called Ultra Gel- it minimizes the amount of sugar you put in your jellies and jams! 
With Sure Gel you use 3 cups smashed fruit and 4 cups of sugar.
With Ultra Gel you use 4 cups smashed fruit and 2 cups of sugar.
Amazing right? Anyway, just thought you should know- you'd have to experiment with this recipe a little since the amounts are a little different, but basically whatever measurement you use for the fruit, you'd use 1/2 of that measurement for the sugar.)

Bring to boil and add:
5 cups sugar (or if using sure gel, ~1¾ cups sugar)

Return to boil.  Let boil 3 minutes.  Skim off bubbles, if necessary.  Pour into hot pint jars. Seal with lids and rings.  Let cool.  Jars should seal (pop) as temperature lowers.

Wah-LA!

 One more note: you will be finding pricklies in your kitchen for the next week no matter how many times you mop. YE BE WARNED

There is no rhyme for Hummus.

Friday, January 14, 2011

I was going to title this post something cute- an equivalent of such titles as "Playing hookie for a cookie," or "Oh gosh do I love squash," But there is no rhyme for Hummus.  The closest word you can find is one just ending in "us" like nucleus or hypothalamus.  What fun is that?  "I go ape for middle-eastern basil garlic Hummus. as does my almond-sized hypothalamus."  errr..... something....

Despite it's seclusion from all words of rhyming influence, Hummus is actually quite the culinary companion for a lot of food words such as pita chips, homemade bread, tortilla chips, veggies, crackers and chocolate cake.  Just checking to see if you actually were reading or just skipping through to get to the pictures and actual recipe. That's right- I got your number, you blog skimmers (and to that you could simply say "It takes one to know one" and I wouldn't argue).  Since I know how much you love to read and read and read mundane facts, I thought I'd just post a link to the interesting origin of Hummus and get right on to the recipe. Woot!  This is SO SO SO much better than any I've tried from the store.  I also like that there is no added oil- a lot of recipes add evoo, but there is enough natural oil present in the tahini (which can be found at sprouts in the nut spread isle. Yes, they have a nut spread isle).


Hummmmmus
4 cloves garlic
2 cups or 1 can Garbanzo beans- also known as Chickpeas (reserve liquid)
1+1/2 tsp kosher salt
1/3 cup tahini (sesame paste- or sub peanut butter)
6 Tbs Lemon Juice (2 lemons)
8 dashes hot sauce (I used Franks Red Hot)
6 Tbs of the reserved Garbanzo bean liquid

Puree together in a food processor.
____________________________________________

yup, that's it.  So nummy.

You can add whatever you want to flavor it differently.  here are some ideas:
roasted red pepper
basil
italian parsley
toasted pinenuts
cilantro
sun-dried tomato
olive
lemon
chocolate cake

Yeah, I must be craving chocolate cake today. lawl.
Enjoy, y'all.

Haiku Wednesday

Wednesday, July 21, 2010

Old things ripped and cut
Beauty from the forgotten
Broke fashion design

6-week Progress and Garlic!

Tuesday, June 2, 2009

Hey y'all! Here is the 6 week progress video(s). I took two different videos and I like both so I'm showing both :o)


Also, I dug our garlic up, braided the roots together and hung it to dry! I'm sad that I only harvested 2 of them- the others I had to dig up and transplant to pots to make room for the garden in April and I wasn't able to save them- the larger of these two was transplanted and did alright but I had three die on me :o( I ripped too many roots. I can't wait to plant some more in October! What fun!