Hey-o people in cyber space! I have been freezer-paper-stenciling t-shirts for a few years now, and after our trip to Disneyland this week (for which I stenciled 6 shirts), people have been asking for a tutorial. There are actually a lot of tutorials on the web, many of which use cricuts or silhouette machines, but I figured I'd show you that someone you know can do it by hand and so can you :)
Here are a few examples of shirts I've made with FP stenciling:
PREGNANT SKELETON
This is how I announced my pregnancy on Halloween, 2014
The old PEPSI LOGO
I was hired to run the Pepsi Challenge for MomDoc (largest OBGYN in the SW US). They were throwing an 80's party for their staff. They even had the Back to the Future DeLorean there.
Please excuse the pregnancy belly ;)
Of course it looks better on Megan (This was for 80's day at their school in 2015)
LUCKY St Patty's day shirts
I LOVE YOU. I KNOW.
We have always been huge Star Wars fans, so this was my Valentine's Day gift to my Valentine :)
BOOK CROOKS
Matthew and three friends competed in the 2016 Battle of the Books. The kids are given a list of 30 books of which they have to read at least 20 by the time the competition rolls around. At the competition the kids are asked questions from the book and when they answer they have to cite the book and state the author. They named their team the "Book Crooks: Kern County Library's Most Wanted." They approved the design and I made them all these shirts that they wore with black or red bandanas. They had so much fun and Matthew ended up getting an honorable mention out of hundreds of kids!
2016 HARRY POTTER MARATHON
During Spring break 2016 our friend, Houston Goodman, flew in from Arizona and the kids had a Harry Potter Marathon. So fun! Here are the shirts I made them- These babies were tedious!!
Our March 2016 Disneyland trip with our friends:
Aaron's
SNUGGLY DUCKLING shirt
An homage to Tangled
My
MICKEY AND MINNIE KISS shirt
John's
SPACE MOUNTAIN SHIRT
(Did you know Disney permanently changed Space Mountain to Hyperspace Mountain??? LAME)
Chrissy's
MARY POPPINS SHIRT
Megan's
bleached-out MEGARA SILHOUETTE SHIRT
bleached-out ANNA SILHOUETTE SHIRT
They wanted to match ;)
Matthew's
bleached-out YODA SILHOUETTE SHIRT
(I sprayed with glow in the dark paint before bleaching and I added green paint for the light saber)
A girl in line at Disneyland offered to buy Matt's shirt. LOL
I also wanted to show our elk head Christmas shirts, but I couldn't find any pictures :/ Oh well!
--------------OK! Now for the tutorial!!------------
Freezer Paper Stenciling (by hand) TUTORIAL
You need:
Shirt- prewashed
Paint- any paint that's meant for fabric. Puff paint, slick paint, fabric spray paint (that's a new thing and it makes this even easier)
Freezer Paper- found at the grocery store in the tinfoil/ziplock bag isle
X-acto knife or Box cutter-with new/sharp blade
Self healing mat or cardboard
Printer with paper or cardstock
Tape- scotch
Foam brush-or other paint applying tool
Iron
Sharpie for correcting mistakes on black shirts
Flattened cereal box or cardboard to stick in between the shirt layers- you don't want paint or bleach coming through to the back!
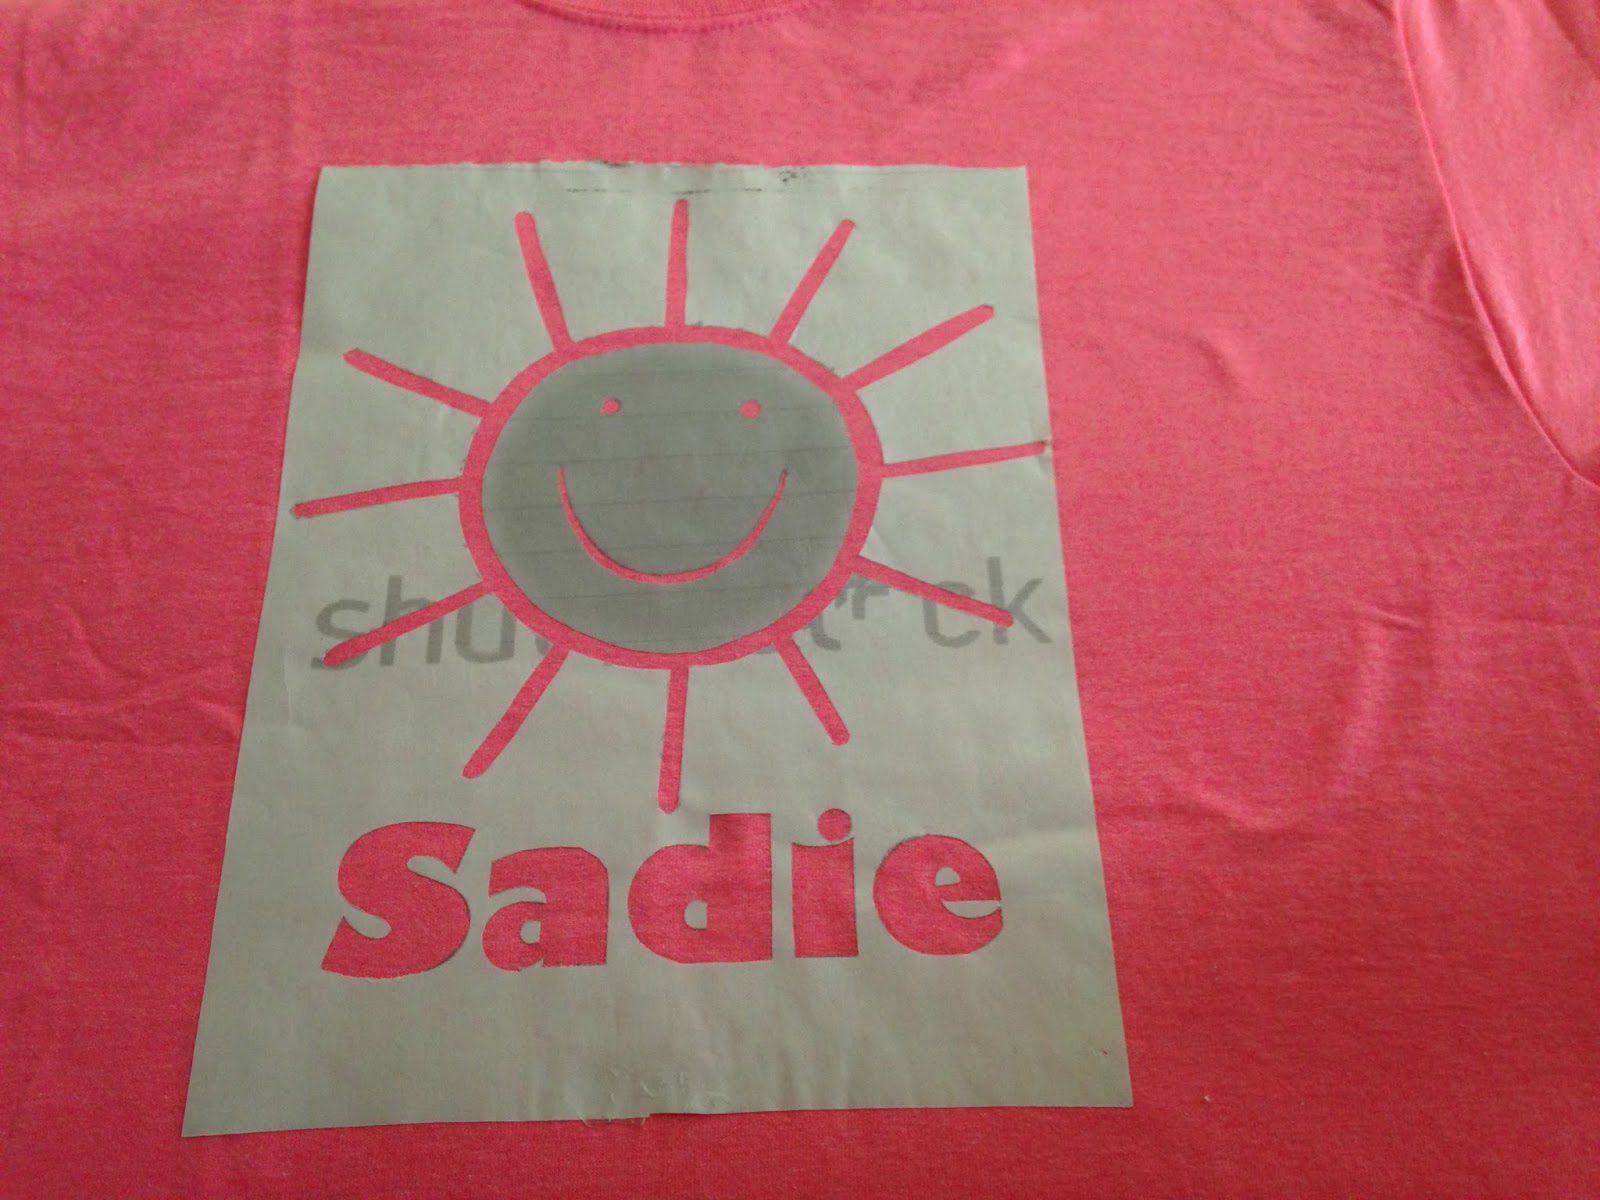
Meg and Matt's friend, Sadie's birthday party was this weekend. I decided to make a shirt to match the stuff I bought her, so I'm using this opportunity to make your tutorial :) The notebook and tote bag say
"Sunshine is instant happiness"
I looked online for pictures of sunshine happy faces.

I didn't find one that looked exactly the way I wanted so I just chose the closest thing and edited it, I also added Sadie's name and changed the color to grayscale so I wouldn't use up expensive ink
Then I cut out freezer paper the size of printer paper and taped it together to run through the printer.
Make sure to only tape the top and bottom so that the picture prints as smoothly as possible. Make sure the plastic/shiny side of the freezer paper is taped down to the printer paper so it will print on the paper/dull side. ALSO I like to use cardstock. It seems sturdier to me, but you can use regular paper if you want.
Print, remove freezer paper from printer paper and cut out with an X-acto knife or box cutter on a self healing mat or cardboard. If your design is big and easy then you could cut it with scissors. Use your discretion.
Be mindful of which part of the paper you will be using. If I want the outline, rays, happy face, and name to be painted surrounded by pink t-shirt, then I use the paper on the left. If I want those things to be t-shirt color with paint in the negative areas, I would use the design on the right (like the bleached-out t-shirt design).
Iron at high temp right on to the shirt. Make sure to go over each part specifically to make sure it irons down. Let it cool and seal the plastic bond before painting.
Yes, I ironed on those TEEENY insides of the letters. Don't throw them away!
Now don't forget to put some cardboard or flattened cereal box between the layers of your shirt.
Time to paint!!
Use a foam brush to dab paint on. If you pull the paintbrush across the shirt instead of dabbing, you can push paint between the stencil and the fabric, which you don't want. Once the first coat is done, you can then pull the brush across because the first coat seals the edges down. I usually do 3 coats, drying completely between each.
I'm impatient. You don't need to use a blow dryer like I did. I don't always but I needed to send this gift with the kids in a matter of minutes. I'm a procrastinator.
Once COMPLETELY dry, pull it up!
The paper will rip in small places. It's ok, just pinch it and pull it off.
HOW CUTE IS THAT?!?!?:!
I love this happy sunshine shirt! I want one!
Other noteworthy tips:
-A hint for anyone doing this for the first time- if you use a black t-shirt you can fix mistakes with a black sharpie ;)
-You can change it up with different textured sponges, paints, and even striped or otherwise patterned shirts :)
-Beware: NOT ALL PAINTS ARE CREATED EQUAL! One I got for really cheap ended up being too watery and made the stencil soggy. If you get a paint like that, don't throw it away, just let it sit out to thicken up (but the best bet is to not get the absolute cheapest paint you can find like I did ;)
-For the bleached-out version: just iron on the negative of the stencil like I mentioned before, put your cardboard between the layers of the shirt, and lightly spray with straight bleach. As soon as it turns the color you want, rinse out immediately, remove any remaining stencil, and then wash with detergent in the washing machine and dry in dryer. *note: please use gloves and mask when using bleach
If you use this tutorial, please post pictures of your creations! I'd love to see the great designs you come up with!
HAVE FUN!!!